Sentieon; your swift secondary analysis solution.
Golden Helix’s software solutions present a reputable and top-quality analysis of your NGS data. Looking at this process from a 30,000 ft view, the annotation and filtering of variants in your vcf files and discovery of CNVs based coverage data in the bam file make up the tertiary level portion of the analysis. However, what solution does Golden Helix offer regarding secondary analysis; i.e., the alignment of reads and variant calling process?
Last year we announced our partnership with Sentieon to provide our users a top of the line accurate and exceedingly fast secondary solution. The purpose of this blog post is to add additional instruction on getting started with Sentieon and prepping to run your secondary pipeline.
First steps: Getting started
If you click on the link above, you will be directed to our step by step guide to get Sentieon installed and set up on your machine. There is some consideration to have before making license requests and downloading content. First and foremost, consider the environment you would like to run the software. Sentieon is fast, really fast, but it still is going to perform best in a robust computational environment (a server for example).
Following the guide, you’ll see the first step is to download the required files. After updating your proxy settings if necessary, you’ll then need to prep to download the Sentieon content (Fig 1). After installing Git, you can then run the downloading scripts (Fig 2). These instructions coincide with additional instruction for a Windows install.


With these steps completed, you will then have the Windows_Sentieon directory created containing the secondary analysis directory. If you are installing in windows instead of Linux, you’ll also create a Cygwin terminal to run the simple Linux commands for Sentieon.

Second Step: Requesting the License File
This step will also require contacting Golden Helix to discuss setting up a trial run of the software. Our sales team is always available and excited to discuss the benefits of utilizing Sentieon as your secondary analysis solution. Once we have approved the trial session for our users, they can run this licensing script to get the license file from us at Golden Helix (Fig 4).

Step 3: Creating an example pipeline
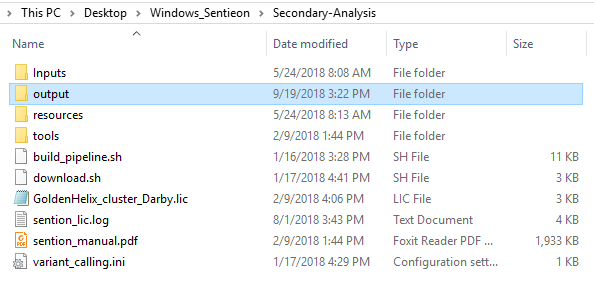
We supply an example pipeline that users can utilize to gain insight on what a pipeline script (i.e., bash script) may look like. This example build_pipeline.sh file is available in secondary analysis folder after download. After receiving the license file from Golden Helix, you may also consider copying it into your secondary analysis folder (Fig 5).

When running the pipeline script, you’ll go through a series of steps to name your sample, designate the path to your Fastq files (in an inputs directory I created in the secondary analysis directory; see Fig 5.), output alignment metrics, and access the license file (Fig 6).

After running the build_pipeline script in either your Cygwin or Linux terminal, you will see that a new output directory is created in the secondary analysis directory, which contains the call_variants script (Fig 7).


Let’s take a quick look at what is in this call variant script. This script file contains the number of threads determined from when running the license request command, annotation and reference sequence file paths, sample names and paths, path to Sentieon tools and license file, and the output folder path.

The next section of the call_variant script lists the algorithms and steps along the alignment and variant calling process. This first runs the BWA-MEM equivalent for alignment, producing metrics results, deduping the repetitive reads and finally calling the variants (Fig 9).

Users can customize their call_variants script to whichever settings and algorithms they wish to use, and an excellent reference for these options is the Sentieon manual found in the secondary analysis directory.
Now the final step is to run the call_variant script (Fig 10). You’ll see this script run through the alignment, metrics, deduping, and variant calling steps. After completing the run, you’ll find the bam/vcf files in the output folder, as well as the metric output information generated in the second step from the script. These bam/vcf files can then be imported into VarSeq/SVS for your DNAseq analysis. This concludes the basics behind getting Sentieon installed and running your example pipeline. A future Sentieon blog will describe more advanced steps in customizing your call_variant script for joint calling and running batches of samples in one run.


Part II of this getting started can be found here which covers custom scripts for batch runs.